

CXF拦截器(Interceptor)的使用
Interceptor是CXF架构中一个很有特色的模式。你可以在不对核心模块进行修改的情况下,动态添加很多功能。这对于CXF这个以处理消息为中心的服务框架来说是非常有用的,CXF通过在Interceptor中对消息进行特殊处理,实现了很多重要功能模块,例如:日志记录,Soap消息处理,消息的压缩处理。
如果你想对CXF进行扩展,建议你先从interceptor开始。
为了更好的学习和使用CXF,最好先阅读官方的用户手册:
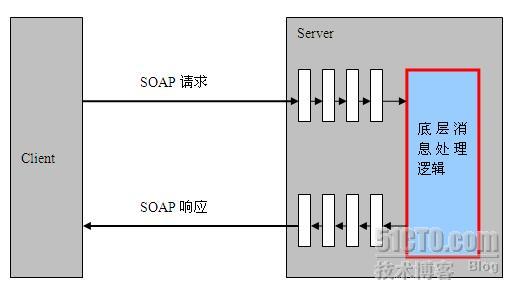
一、基本原理
下面看看CFX Interceptor在整个请求响应的处理过程中所处的位置。
二、CFX Interceptor的核心API
先看拦截器核心包org.apache.cxf.interceptor的说明:Core interceptor interfaces which form the basis for message processing chains in CXF.
翻译:CXF消息处理链最基本的拦截器接口。
一下几个的API的介绍和翻译来自互联网:
Interceptor
定义两个方法,一个处理消息 handleMessage, 一个是处理错误 handleFault。别看Interceptor这么简单,这里需要提醒注意的是,在实行具体的Interceptor的这两个方法中,千万别调用Interceptor内部的成员变量。这是由于Interceptor是面向消息来进行处理的,每个Interceptor都有可能运行在不同的线程中,如果调用了Interceptor中的内部成员变量,就有在Interceptor中造成临界资源的访问的情况,而这时的Interceptor也就不是线程安全的Interc eptor了。
在CXF中最常使用的Interceptor都放在cxf-rt-core中的org.apache.cxf.interceptor中,有兴趣的朋友可以研究一下。
InterceptorChain
单个的Interceptor功能有限,CXF要实现一个SOAP消息处理,需要将许许多多的Interceptor组合在一起使用。因此设计了 InterceptorChain,在我看了InterceptorChain就像是一个Interceptor的小队长。 小队长有调配安置Interceptor的权力(add,remove),也有控制消息处理的权力(doInterceptor,pause,resume,reset,abort),同时也有交付错误处理的权力( {get|set}FaultObserver)。更有意思的是为灵活控制Interceptor的处理消息顺序(doInterceptStartingAt,doInterceptorStartingAfter),这也是InterceptorChain比较难理解的地方。
有兴趣的朋友可以跟踪一下,CXF的Client与Server之间通讯是走过哪些Interceptor,这些Interceptor是如何被调用的。
Fault
定义了CXF中的错误消息。
InterceptorProvider
这里定义了Interceptor的后备保障部队。我们可以在InterceptorProvider中设置In,Out,InFault,OutFault 后备小分队,添加我们所希望添加的Interceptor。而InterceptorChain会根据这些后备小分队,组建自己的小分队实例,完成具体的作战功能任务。
AbstractAttributedInterceptorProvider
InterceptorProvider实现的抽象类,由于这个类来继承了HashMap,我们可以像这个类中存储一些属性信息。
AbstractBasicInterceptorProvider
Message
由于Interceptor是针对Message来进行处理的,当你打开Message这个类文件时,你会发现在Message中定义了很多常量,同时你还可以从Message中获取到很多与Message操作相关的信息。可以获取设置的对象有InterceptorChain Exchange Destination,还有获取设置Content的泛型接口,是不是感觉Message和Bus差不多,都成了大杂货铺,一切与消息处理相关的信息都可以放在Message中。我想这也是咱CXF以Message处理为中心的设计思想的具体表现吧。
Exchange
和Message打交道就离不开Exchange。Exchange建立In/Out,InFault/OutFault Message 之间的联系。你可以从Exchange中获取到与消息传输相关的Conduit,Destination的信息,同时也可以设置和Session相关的其他信息,以及知道是否是OneWay的消息。
AbstractFeature
为了简化配置Interceptor的复杂操作,在这里设置了AbstractFeature,通过Feature我们可以向Bus,Client,Endpoint配置不同功能的Interceptor组。这样可以极大减轻我们配置文件的体积。
<
jaxws:endpoint
id
="greeter"
address
="http://localhost:8080/hello"
implementor
="ws.HelloWorldImpl"
>
< jaxws:inInterceptors >
< bean class ="org.apache.cxf.interceptor.LoggingInInterceptor" />
</ jaxws:inInterceptors >
< jaxws:outInterceptors >
< bean class ="org.apache.cxf.interceptor.LoggingOutInterceptor" >
</ jaxws:outInterceptors >
< jaxws:inFaultInterceptors >
< bean class ="org.apache.cxf.interceptor.LoggingInInterceptor" />
</ jaxws:inInterceptors >
< jaxws:outFaultInterceptors >
< bean class ="org.apache.cxf.interceptor.LoggingOutInterceptor" > </ jaxws:outInterceptors >
</ jaxws:endpoint >
而一旦使用了Feature,我们的配置文件就变成了
<
jaxws:endpoint
id ="greeter"
address ="http://localhost:8080/hello"
implementor ="ws.HelloWorldImpl" >
< jaxws:features >
< bean class ="org.apache.cxf.feature.LoggingFeature" />
</ jaxws:features >
</ jaxws:endpoint >
id ="greeter"
address ="http://localhost:8080/hello"
implementor ="ws.HelloWorldImpl" >
< jaxws:features >
< bean class ="org.apache.cxf.feature.LoggingFeature" />
</ jaxws:features >
</ jaxws:endpoint >
三、CXF拦截器使用
之需要在在上文例子的基础做一点点改动:
服务端
package ws;
import org.apache.cxf.endpoint.Server;
import org.apache.cxf.interceptor.LoggingInInterceptor;
import org.apache.cxf.jaxws.JaxWsServerfactorybean;
/**
* 服务端程序设置与启动程序
*
* @author leizhimin 2009-6-11 14:41:23
*/
public class HelloWorldServer {
public static void main(String[] args) {
JaxWsServerfactorybean factory = new JaxWsServerfactorybean();
factory.setServiceClass(HelloWorldImpl. class);
factory.setAddress( "http://localhost:8080/service/HelloWorld");
factory.getininterceptors().add(new LoggingInInterceptor());
Server server = factory.create();
server.start();
}
}
客户端
package client;
import org.apache.cxf.interceptor.LoggingInInterceptor;
import org.apache.cxf.jaxws.JaxWsProxyfactorybean;
import ws.HelloWorld;
/**
* 客户端调用代码
*
* @author leizhimin 2009-6-11 14:46:45
*/
public class TestClient {
public static void main(String[] args) {
JaxWsProxyfactorybean factory = new JaxWsProxyfactorybean();
factory.setAddress( "http://localhost:8080/service/HelloWorld");
factory.setServiceClass(HelloWorld.class);
factory.getininterceptors().add(new LoggingInInterceptor());
HelloWorld helloWorld = (HelloWorld) factory.create();
String msg = helloWorld.sayHello("World");
System.out.println(msg);
}
}
四、测试
先运行服务端,然后运行客户端。
1、服务端控制台窗口:
在服务端控制台打印的日志截图是如下

实际的日志内容如下:
信息: Inbound Message
----------------------------
ID: 1
Address: /service/HelloWorld
Encoding: UTF-8
Content-Type: text/xml; charset=UTF-8
Headers: {Content-Length=[179],Host=[localhost:8080],User-Agent=[Apache CXF 2.2.2],connection=[keep-alive],SOAPAction=[""],Pragma=[no-cache],Content-Type=[text/xml; charset=UTF-8],content-type=[text/xml; charset=UTF-8],Cache-Control=[no-cache],Accept=[*/*]}
Payload: <soap:Envelope xmlns:soap="http://schemas.xmlsoap.org/soap/envelope/"><soap:Body><ns2:sayHello xmlns:ns2="http://ws/"><arg0>World</arg0></ns2:sayHello></soap:Body></soap:Envelope>
--------------------------------------
2、客户端控制台窗口:
在客户端控制台打印的日志截图是如下

实际的日志内容如下:
信息: Inbound Message
----------------------------
ID: 1
Encoding: UTF-8
Content-Type: text/xml; charset=utf-8
Headers: {Content-Length=[206],Server=[Jetty(6.1.18)],content-type=[text/xml; charset=utf-8]}
Payload: <soap:Envelope xmlns:soap="http://schemas.xmlsoap.org/soap/envelope/"><soap:Body><ns2:sayHelloResponse xmlns:ns2="http://ws/"><return>Hello World!</return></ns2:sayHelloResponse></soap:Body></soap:Envelope>
--------------------------------------
五、定义自己的Interceptor
自定的Interceptor一定要实现CXF的Interceptor接口,这个接口中有两个方法:
void handleFault(T message)
void handleMessage(T message)
参考文档:
互联网的API翻译。
版权声明:本文内容由互联网用户自发贡献,该文观点与技术仅代表作者本人。本站仅提供信息存储空间服务,不拥有所有权,不承担相关法律责任。如发现本站有涉嫌侵权/违法违规的内容, 请发送邮件至 [email protected] 举报,一经查实,本站将立刻删除。
